Sunday, February 3, 2013

Page 010-02 Build Time: 167 hrs

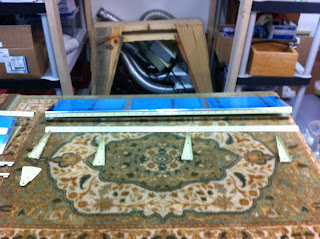
Not much to report. Deburring the tail cone skins. I only have the top skin left. I started out with my standard method, file, shave the burr left by the file with the deburr tool and smooth it out with some aluminum oxide. Each skin was running about 2 hours including removing the plastic. Three weekends into it and I went down and bought a 1/4 inch right angle die grinder and some 2 inch red scotch bright pads at the local auto paint store. What a difference. Cut the time down by half. I still have to be carful to make sure the rotation of the pad is always leaving the skin so I don't hook it and cause a bend but so far, so good. I'm still using the file as a first step because I want to take out the burrs left by the sheer but I do have a couple pads that look to be the next more abrasive size and may try to see how that works on an edge. I don't want to take a chance on the 0.020 skins though since they're so thin and shipping a nine foot skin won't be cheap.
No pics this time but I should be into the frames next week and then onto the aft bulkhead. Grinding away!

Wednesday, January 16, 2013

Page 09-10 Build Time: 153 hrs

Stabilator Complete

This represents a significant amount of work. Assembly was straight forward since I pretty much pre-assemble everything prior to prime so I don't miss anything. Each section comes out a bit better from the lessons learned in the previous sections. Also, getting familiar with the build book and it's flow helps. Vans definitely does an excellent job. This is a huge project and I have the highest respect for those who have done more than one and those who use solid rivets for an entire project.


I do like to rivet with conventional rivets but if your not doing this every week basically you're practicing on your project. If you can do a little everyday you'll be fine and won't drill too many out. I went ahead and bought the main squeeze because the one I had was a economy tool. When I bought it I didn't expect to use it very often (and haven't) but it wasn't working out for the 3/16 rivets. The main squeeze has a cam and you can finish out the rivet with one hand. This really helps and the counter weight brackets came out perfect.

  
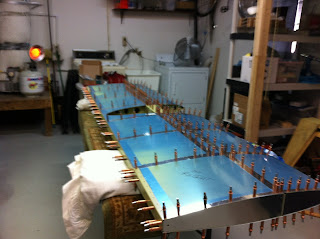
Once the skeleton was complete it was time to get out every copper cleco I owned and lay down the skins. Getting the leading edge started was best done by propping the skin up and laying a 2X4 block under the skeleton. This allowed the needed space to get the leading holes in the ribs lined up without trying to hold everything open.  


You can see I've become a fan of leaving the plastic on until the part is finished. I do this for two reasons - to keep the over spray down during prime and protect the surface during assembly. Also, if the punch pushed the hole so that's the burr is on the inside there's no need to deburr this side. As most have noted go very lightly on all holes if you feel the need to deburr. 10% of a 0.020 skin is basically un-measurable by the home builder and if you've done more than that your are beyond spec. I've spent more time cleaning up over spray and burnishing out light scratches on the skins than it takes to line out the plastic with a dull solder iron. Just go light and don't try to completely separate the plastic and make sure only the copper of the iron is used. Absolutely no lead should ever touch your alclad.


You don't really need to use all these clecos but it's nice to have it all together and doing a final inspection before you get out the rivet puller. Triple check everything because once you start rolling through pulling rivets it would be a huge AW-SHIT moment if you had to drill those little guys out - but it's doable. I had to drill one out because I missed one spot on the plastic. As soon as I pulled the rivet I saw it and it was "oh crap". It came out no problem (use a # 30 to get the head off and a #40 on the shank until it just falls out). Since I didn't have the other side riveted yet it was no big deal to chase down the shank but I did have to un-cleco the entire skin and hunt it down.


I'm very happy with the finished product. This was enough of an airplane part to start making airplane noises. Some of the things I'll improve on is the primer - two light coats and get the edges first. Watch a couple videos on U-Tube and you'll get the idea. If you're going to put down primer put it down. If you're concerned about the weight loose a few pounds. The pneumatic puller came into focus pulling this many rivets. You don't need pressure on the head of the rivet before pulling. Just make sure it's flush and flat - the puller will do the rest. A light touch is all that's needed and it tends to make the joint perfectly flat (unless you're pulling over a couple ribs and the skin will conform to the underlying structure). There are no dimples or pulled areas on the skins. They are as flat as they were when they arrived. Very nice. Also, read ahead and read it again. Call Vans if you're not sure and get on VansAirforce to look for answers or post questions. There's an enormous amount of info out there that everyone (including me) are sharing.

count by weight - 1 gram per mandrill
It was a 600 rivet day. On to the tail cone! 

Sunday, January 6, 2013

Page 09-08 Build Time: 129 hrs

All parts are through primer and ready for final assembly. This represents a solid weeks worth or work. The Christmas break is over and I made significant progress on the tail feathers but putting it all together will have to wait for another week. Yesterday was a very long day of prep, primer and cleaning the gun several times. I mixed up 8 oz of primer and set some aside (gun only holds 6). But at some point the paint started to spatter again. At first I thought I had reached the end of the pot life and it was thickening. Then I noticed the gun was loosing air at the hose and that seemed to be the problem. So I cleaned up the gun, loaded the rest and went on. Then the air on the gun wouldn't stop. That caused the compressor to run constantly until it tripped the breaker. So I figured that out - was some dried paint on the trigger pin, cleaned up the gun and took a dinner break. I still had the skins to do and thought that might have to wait until today but I had planned on flying and it was only 7PM so out I went, mixed up some more paint and went back at it. Everything worked out this time since I pretty much ran into everything you could except spilling large amounts of primer on the ground. This morning when inspecting the parts I noticed the right lower corner of the skins were a little too light. You could still see the aluminum. Since I'd spent so much time getting to this point seeking perfection I couldn't live with that's good enough. So out came the paint, gun, masking and I scuffed up the area I wanted to re-coat and cleaned it up and shot a light coat only on the problem areas. This stuff is rock hard. I've always been concerned about it sticking but in twelve hours it's like powder coat. I had intended to keep it light but those corners were near the ground in a shadow so I missed it. I also don't want to keep piling it up while it's wet. Going forward I'll use two very light coats on the skins. They came out nice.
Ready for assembly


Once the parts were where I wanted them it was time to fly. I had planned on some IFR since we had a small storm move through. I decided to head north and not chase the ice but it turned out I only got 0.3 IMC and no approaches. That was the plan I it was a good plan so no need to deviate. It was a nice ride and I love being in the clouds.

It will be "different" flying a RV with a glass panel, AHRS and synthetic vision that will never be able to do what the might Cessna can do. Oh well, maybe I'll have to keep the old girl.

Up with the angels


Wednesday, January 2, 2013

Page 09-04 Build Time: 96 hrs

Worked through the Horizontal Stabilizer spar box and put in an honest 9 hours today. Could have went farther but you get mentally exhausted and that's when mistakes happen. Most of the time is spent either re-reading the instructions so I don't miss a step, thinking ahead to make sure all is well and of course - deburring. Found that the control horns had the 0.06 gap in the box and a quick search on Vans Air-force showed that some had also ran into this issue. The post was from 2009 so I'm a bit concerned that this kind of problem would still be around. In any case I took the time to lay out all the parts and measure the hole spacing in the the skeleton assembly and the skins. My thoughts were that the spar cap could be short and causing the spar box assembly to come up short. That would put an offset into all of the holes and make assembly impossible. Everything measured out and I expect it all to come together as designed. I fabricated the shims for the horns from some 0.032 2024 stock and while it took the morning to work through this they came out fine. I was tempted to countersink all the way through the shims but that would be a waste of time and have little value. I'll be calling Vans tomorrow to pick up some of the parts that were missing from the kits and discuss the shims. I expect to get the same story and that's why I spent the time to create them. 
All the work to the spar box is complete sans riveting which comes after primer. This was a lot of work but it came out nice.
I ordered the Main Squeeze and I'll give that a try if they send me the pins they left out of the order. I'd like to finish the HS this week if possible. Everything here on is pretty simple except the hinges where the directions say to match drill both on the right skin. I assume the math will all work out but I'll be marking and checking before poking any holes.

Tomorrow will be the ribs, stops and hinges and if I can I'll deburr the skins. If everything goes well perhaps we'll get to scuff and clean the parts for paint but I suspect that will take another day.

Thursday, December 27, 2012

Page 08-04 Build Time: 81 hrs
Anti-Servo Tabs Complete

Eleven hours in debur, scuff and prep for primer, four hours in primer (had to stop and prep the skin and hinge where they attach) and a lean four hours in assembly including drilling out the hinges. The 11 hours in debur included wrinkling one of the skins on the scotchbright wheel. I was looking for a efficient way to get through debur and the wheel caught the edge of the skin - ping! - and it was bent. I did my best to tap it out with a soft mallet but every time I closed my eyes I could see it. Since I was going up to Vans anyway I decided to call and see if they could hold one for me. No problem and it was only $24! I've paid over $70 for a 3X2 piece of FAA/PMA 30 year old aluminum for the Cessna. It's such a joy to work on a plane they actually still build!
Bummer
I used the teflon wheel edge seamer on the skin edges where they attach to the spar. I was tempted to use it on the rudder and wish I would have but I had never used it before and I didn't feel like hacking off a good piece of 2024 just to try it. Now that I had an extra skin I could experiment. It turned out awesome! The book says be carful so I was. While getting a feel for it on the scrap part you could see how it nicely forms the metal. You can also work it back and the bend just disappears. The skins lay just right against the spar. I was mindful that this was very close to the rivet line so not too much. Just enough to make a difference.
Once assemble began it was pretty quick work to get the parts together. Drilling out the hinge was no big deal - just keep reminding yourself only the trailing holes and keep the jig with the notch at the hinge eyelet. Each new part has shown improvement both in technique and the finished product.
Even though the primer is an extra step I still believe it's the way to go. Total weight gain on the parts was 0.8 oz. I mixed up 4 oz of primer and catalyst and thinned it with about 0.5 oz. The last batch took 8 oz and I had to mix up a couple batches to get them all coated. I also remember the paint was splattering a bit and that's generally a sign of thick paint. The gun also needed a good cleaning so I went through it completely. The parts came out excellent (hate to throw out 2 oz of this stuff though) and next time I'm going to try to hit it even lighter. I'm looking for an almost translucent / perl look where the aluminum just peaks out from the primer. In any case, even thought the wing skins look daunting I'm committed on primer for all internal parts. The booth is working out fine also.
I have all four kits now, the main spars came today. I've spent a good 4 days in inventory and should be able to finish up tomorrow morning and then call Vans for the couple items that didn't show up. I also have one pretty nice scratch in a skin. I'll send them a picture and see what they say. I assume I'll just burnish it out. For those using blogs to get info on building I would have to say debur in critical. This is the craft in aircraft. If you look at the work Vans does on some of the parts you can see how much they do. It's a significant part of the process but very necessary. I'd also say that if you don't have the room just do a kit at a time. I chose to get all four because I will build this plane - not just the tail feathers.

On to the stabilator!

Sunday, December 23, 2012

The Trip to Vans
I decided to make the trip to Vans for the rest of the plane when I bought it. It's just up to OR so it seemed like a good idea. I knew they would have the kits ready in December but the west coast weather is such that I fly most of the year so I didn't believe weather would be much of a problem. When they called the weather wasn't too bad and there was a front moving in for the trip but the commitment was made, the trailer reserved and time taken off work, so I went. Turned out to be the blizzard of 2012 and the 9 to 10 hours up turned into a 20 hour drive. What was going to be a quick day up and a day back ended up to be 3 days - pretty much like everything else on this plane - just takes longer than you expect. Now that I'm home safe with $24k of parts I don't regret it but I won't make that trip again until the plane is flying and I can fly to Vans.

There are three mountain passes to get to the Portland area and all three were snowing. The first pass at Mt Shasta had us holding for three and a half hours at Dunsmire while wet sticky snow just piled up.
This put a huge dent in the travel time and I made it as far as Eugene at 3:00AM, pulled in and got a room. After three hours sleep I hit the road because I wanted to make it back down to the passed before night. Vans was cool. Took a quick look around the place and loaded up the truck.
Inside of Vans

If I ever do build again the quick builds seem the way to go. You can unpack the fuselage and make airplane noises the day they deliver. I also saw a 12 that was pretty much complete off to the side. It had some wrinkles in the empennage skins. I don't know if it's the one that I read about on VansAirforce, (I hope it's not a common problem - search thin skinned bird) but Vans was committed to figuring it out. I cleco every hole and work my way out from the center they way I was taught. Aluminum does stretch and when you use a gun you really see it. So the truck is all loaded for the trip home and off we go.
The Photo Op
They had already scheduled the main spars for the shipper and we could have thrown them on top but there was no need to push the envelope. It was bad weather for the trip home and forecasted to get worse so let the professionals deal with the snowy roads.
I made good time back down to Medford - Grants Pass was a non-issue. Snow but no chains required. At Ashland they had us waiting again and reports were that the CA-CHP had closed I5 for an accident. It was only 3PM and I knew if I could get out of the passed by 6 or 7 I'd be fine. Well it didn't quit work out that way. They shut down the passes at Yreaka for blizzard conditions and made us all get off the freeway. I thought about waiting it out in the truck but decided to be conservative (as any good pilot should) and not let get-there-itis cloud my decisions. I'd only had 3 hours sleep in the last two days and had precious cargo so I drove back up to Medford and got a room. Turned out that everything opened up again at 8:30 PM but I had the room so I just decided to keep it on the ground and get some rest. I hit the road again at 4AM in hope of beating the mad rush of traffic that was sure to come when all the rest of the folks got back on the highway - a good decision. Chained up at Syskiyou pass (truck, trailer and used 4 wheel drive) and it was pretty much a none event. The rest of the passes were easy. I kept the chains on the trailer (cables actually - there on and off in 3 minutes) and kept it in 4X4 for the rest of the trip. A note to anyone driving in this weather. It's better to drive 30 mph than 0 mph. Every pass had an accident. From jack-knifed big rigs to overturned SUV's. 
One last pass to the flatlands


Santa's Sleigh out making rounds (guess I wasn't naughty this year!)
Home at last after the trip to the North Pole.
Says do not open till Christmas but I need to get some room in the shop.

So Merry Christmas everyone - Be safe out there! Time to spend the day with the inventory sheets.

Saturday, December 15, 2012

Page 07-05 Build Time: 62 hrs
Rudder complete


Finished the rudder this weekend. Was hoping for faster progress but between riveting and re-reviting (and drilling out rivets) and test fitting the rudder to the vstab the time just added up. After drilling out the first three rivets I've moved onto using the rivet gun. There's no point in not using the correct tools for the job. I'm sure plenty have used squeezers to complete the project but the gun produces superior results. I wasn't satisfied with the shop head using the squeezer. I had to take some time to practice on a few pieces of scrap but once I got started I could set the head to spec in one shot.

I also can't say enough about the pneumatic puller. I can't imagine doing this without it although I've read plenty of blogs where people are trying. The tool produces consistent results every time.


Vans called this week and the finish, wings and fuselage kits are ready. I'll drive up and pick them up next week and take the tour. I'll have the wing spars shipped since my truck won't hold anything that long. It was part of the plan to make the pilgrimage so I'll follow through with but I will loose a day of build time driving up and back. It will be a struggle to fit this stuff in the shop while I'm building but I'll have to make it work.