Page 09-10 Build Time: 153 hrs
Stabilator Complete
This represents a significant amount of work. Assembly was straight forward since I pretty much pre-assemble everything prior to prime so I don't miss anything. Each section comes out a bit better from the lessons learned in the previous sections. Also, getting familiar with the build book and it's flow helps. Vans definitely does an excellent job. This is a huge project and I have the highest respect for those who have done more than one and those who use solid rivets for an entire project.


It was a 600 rivet day. On to the tail cone!
Stabilator Complete
This represents a significant amount of work. Assembly was straight forward since I pretty much pre-assemble everything prior to prime so I don't miss anything. Each section comes out a bit better from the lessons learned in the previous sections. Also, getting familiar with the build book and it's flow helps. Vans definitely does an excellent job. This is a huge project and I have the highest respect for those who have done more than one and those who use solid rivets for an entire project.

I do like to rivet with conventional rivets but if your not doing this every week basically you're practicing on your project. If you can do a little everyday you'll be fine and won't drill too many out. I went ahead and bought the main squeeze because the one I had was a economy tool. When I bought it I didn't expect to use it very often (and haven't) but it wasn't working out for the 3/16 rivets. The main squeeze has a cam and you can finish out the rivet with one hand. This really helps and the counter weight brackets came out perfect.

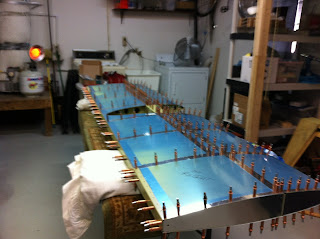
Once the skeleton was complete it was time to get out every copper cleco I owned and lay down the skins. Getting the leading edge started was best done by propping the skin up and laying a 2X4 block under the skeleton. This allowed the needed space to get the leading holes in the ribs lined up without trying to hold everything open.

You can see I've become a fan of leaving the plastic on until the part is finished. I do this for two reasons - to keep the over spray down during prime and protect the surface during assembly. Also, if the punch pushed the hole so that's the burr is on the inside there's no need to deburr this side. As most have noted go very lightly on all holes if you feel the need to deburr. 10% of a 0.020 skin is basically un-measurable by the home builder and if you've done more than that your are beyond spec. I've spent more time cleaning up over spray and burnishing out light scratches on the skins than it takes to line out the plastic with a dull solder iron. Just go light and don't try to completely separate the plastic and make sure only the copper of the iron is used. Absolutely no lead should ever touch your alclad.

You don't really need to use all these clecos but it's nice to have it all together and doing a final inspection before you get out the rivet puller. Triple check everything because once you start rolling through pulling rivets it would be a huge AW-SHIT moment if you had to drill those little guys out - but it's doable. I had to drill one out because I missed one spot on the plastic. As soon as I pulled the rivet I saw it and it was "oh crap". It came out no problem (use a # 30 to get the head off and a #40 on the shank until it just falls out). Since I didn't have the other side riveted yet it was no big deal to chase down the shank but I did have to un-cleco the entire skin and hunt it down.

I'm very happy with the finished product. This was enough of an airplane part to start making airplane noises. Some of the things I'll improve on is the primer - two light coats and get the edges first. Watch a couple videos on U-Tube and you'll get the idea. If you're going to put down primer put it down. If you're concerned about the weight loose a few pounds. The pneumatic puller came into focus pulling this many rivets. You don't need pressure on the head of the rivet before pulling. Just make sure it's flush and flat - the puller will do the rest. A light touch is all that's needed and it tends to make the joint perfectly flat (unless you're pulling over a couple ribs and the skin will conform to the underlying structure). There are no dimples or pulled areas on the skins. They are as flat as they were when they arrived. Very nice. Also, read ahead and read it again. Call Vans if you're not sure and get on VansAirforce to look for answers or post questions. There's an enormous amount of info out there that everyone (including me) are sharing.
 | |
| count by weight - 1 gram per mandrill |
No comments:
Post a Comment